How to Measure Fry Pan Size: Inner vs. Outer Diameter & Cooking Surface Guide
1. Introduction: Why Accurate Fry Pan Measurements Matter
Before you invest in a new frying pan or attempt to pair it with a lid or burner, you need to know its exact dimensions. Accurate measurements ensure even heat distribution, proper fit for lids and accessories, and better organization in your kitchen.
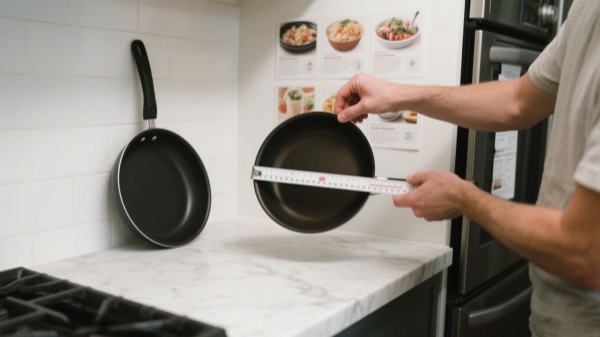
Many pans are labeled by their rim-to-rim diameter, but understanding the difference between that value and the true cooking surface can save you from surprises when you start cooking. In this guide, you will learn how to measure every dimension of your fry pan—inner diameter, cooking surface, depth, base diameter, base thickness, and handle length—using simple tools you probably already have.
2. Fry Pan Size: Basic Concepts and Key Terms
2.1 Inner Diameter vs. Outer Diameter
Inner Diameter refers to the distance from the inside edge (lip) of the fry pan on one side to the inside edge on the opposite side. This measurement determines how much cooking surface you truly have available.
Outer Diameter is measured from the outside edge of one side to the outside edge of the other. Cookware Manufacturers sometimes use this to label the pan size, but it includes the thickness of the walls.
2.2 Cooking Surface Diameter
The cooking surface diameter is the width of the flat bottom area where food actually makes contact with the pan. In pans with sloped sides, this is often 1–2 inches smaller than the inner diameter.
2.3 Pan Depth
Pan depth is the vertical distance from the bottom of the cooking surface to the top edge of the pan’s interior wall. This determines how much liquid or volume you can comfortably cook.
2.4 Base Diameter
Base diameter is the diameter of the pan’s bottom when measured on the outside. It’s important for matching the pan to the size of your burner or induction zone.
2.5 Base Thickness
Base thickness is the measurement of the pan’s bottom thickness. A thicker base provides more even heat distribution and better heat retention, while a thinner base heats quickly but can develop hot spots.
2.6 Handle Length
Handle length is measured from the point where the handle connects to the pan body to the furthest edge of the handle. The right handle length ensures a comfortable grip and safe maneuvering.
3. Tools and Preparation
3.1 Measuring Tools
- Flexible Tape Measure – Ideal for spanning curved edges.
- Metal Ruler or Caliper – Provides precise, rigid measurements.
- Small Level or Straightedge – Helps identify the true flat cooking area.
3.2 Measurement Environment
Place your pan on a flat, stable surface such as a countertop or sturdy table. Ensure there is enough room around the pan to fully extend the measuring tool without interference.
Clean the pan thoroughly before measuring to remove any debris or residue that could create false readings.

3.3 Important Considerations
- Units: Decide whether to use inches or centimeters before you begin, and be consistent.
- Multiple Reads: Measure each dimension at least twice and use the average to reduce error.
- Tool Calibration: Make sure your ruler or tape measure starts exactly at zero.
4. How to Measure the Cooking Surface Diameter
The cooking surface diameter is the width of the flat bottom where food actually contacts the pan. On pans with sloped walls, this value is smaller than the inner diameter. Here’s how to find it:

- Place a small level or straightedge flat on the bottom of the pan so its ends touch where the flat area meets the sloped sides.
- Mark or note the two points on the rim of the level/straightedge where it touches the pan interior.
- Move the level aside and use your flexible tape measure (or caliper) to measure the straight-line distance between those two points. This is your cooking surface diameter.
- Verify by repeating at a perpendicular orientation for accuracy.
5. How to Measure Pan Depth
Pan depth determines how much volume you can cook—important for sauces or larger quantities of food. Follow these instructions:

- Stand the pan upright on its base so the interior wall faces you.
- Place a metal ruler or caliper vertically inside the pan, making sure one end touches the bottom center.
- Read the measurement at the topmost point of the inner wall. That is the pan’s depth.
- If the bottom is slightly concave or has raised ridges, ensure that your measuring end sits at the lowest point of the cooking surface.
6. How to Measure Base Diameter and Base Thickness
6.1 Base Diameter
The base diameter tells you how large a burner or induction zone you need. To measure it:
- Flip the pan upside down so its bottom faces up.
- Use your flexible tape measure or ruler to measure across the widest part of the bottom (excluding any text or raised patterns).
- Record the distance; this is the base diameter.
- Repeat at a right angle to confirm consistency if the base isn’t perfectly circular.
6.2 Base Thickness
Base thickness influences how evenly the pan heats and how well it retains heat. Two methods to measure:
- Method 1: With the pan upside down, place a caliper or ruler at the thickest point where the bottom meets the sidewall and read that thickness directly.
- Method 2: Place the pan upright and measure the total depth (from top rim to bottom). Then measure the interior depth (from top rim to cooking surface). Subtract the interior depth from the total depth to get the base thickness.
7. How to Measure Handle Length
Handle length affects comfort and safety when lifting or tilting the pan. Use the following steps:
- Keep the pan upright on its base.
- Place the zero end of your tape measure at the point where the handle meets the pan body.
- Extend the tape along the centerline of the handle to its farthest edge.
- Record this distance as the handle length.
- If the handle is removable, measure the main handle first and then the detachable piece separately.
8. Common Measurement Pitfalls and Practical Tips
8.1 Label vs. Actual Size
Manufacturers often label pans by the measurement across the top lip. This can be larger than the true cooking surface by 1–2 inches due to sloped walls. Always measure yourself if exact size matters.
8.2 Flexible Tape vs. Rigid Ruler
Flexible tapes can bend or sag, causing slight errors. Use a rigid ruler or caliper on flat surfaces (like the cooking surface or base) for greater accuracy.
8.3 Sloped Walls and Flat Area
Pans with sharply sloped walls appear larger when measured rim-to-rim. By isolating the flat cooking surface, you get a more precise indicator of usable space.
8.4 Repeated Measurements
Take each measurement two to three times, ideally at different angles, and average the results. This minimizes errors caused by uneven surfaces or tool placement.
8.5 Choosing the Right Tool
Calipers are best for measuring small differences like base thickness. Flexible tapes are fine for inner diameter and handle length, but ensure they are flat and centered.

9. Applying Measurements in Practice
9.1 Selecting a New Fry Pan
When shopping online or in-store, compare your recorded measurements to product specifications. If you need a 10-inch cooking surface, verify that the interior flat area is at least 10 inches rather than relying on a 12-inch label alone.
9.2 Matching Lids and Accessories
Use your inner diameter measurement to choose lids that fit snugly. A lid labeled for a 12-inch pan may leak if your actual cooking surface is only 11.5 inches.
9.3 Burner Compatibility
Check your burner or induction zone size against the base diameter. A base diameter slightly smaller than the burner ensures even heat. If the base is too small, heat may dissipate around the edges; if it’s too large, the pan may not heat evenly.
9.4 Cooking Capacity and Recipes
Knowing the flat cooking surface and pan depth helps you estimate how much food a pan can handle. A deeper pan is better for sauces or stir-fries, while a wider flat surface suits searing meats.
9.5 Kitchen Storage and Organization
Record your pan dimensions in a kitchen notebook or digital file. When organizing cabinets or stacking multiple pans, you’ll know exactly which nesting sets will fit together without taking up extra space.
10. Conclusion and Recommendations
Accurate measurements ensure you get the right pan for your cooking style, fit your cookware with lids and accessories properly, and match burners for optimal heat distribution. By following the steps outlined above, you’ll be able to document each dimension—inner diameter, cooking surface, depth, base diameter, base thickness, and handle length—with confidence.
Remember to measure each dimension multiple times, use appropriate tools (rigid rulers or calipers for flat surfaces, flexible tape for curved edges), and record your results. Keeping this information on hand will streamline future purchases and improve your overall cooking experience.
11. FAQ
- Why doesn’t the labeled size match my measurement? Manufacturers often round up or measure at the rim, including wall thickness. Always trust your actual readings for cooking surface.
- Can I use a ruler instead of a tape measure? Yes, but a rigid ruler or caliper is only recommended for flat surfaces. Use flexible tape for measuring across curved edges or sidewalls.
- How do I record these measurements for future reference? Keep a small kitchen notebook, a digital note, or even a photo of a labeled sketch. Refer back when shopping or organizing cookware.
How Big is a 2/4/8 Quart Pot? Actual Dimensions & Practical Uses
How to Measure Fry Pan Size: Th Inner Dimension Rule